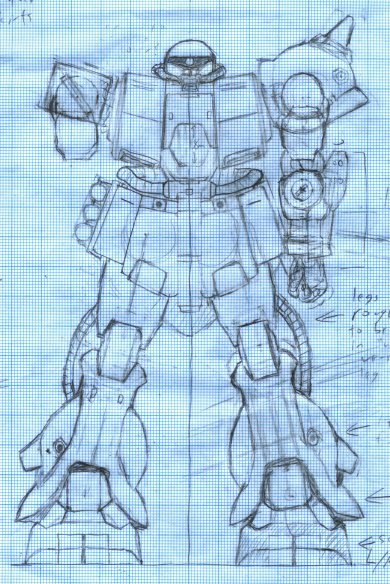
1:100 Zaku Kai - Orthographic design renderings |
All the best material I've read on scratchbuilding emphasizes the creation of detailed plans as a first step. If a plan is good enough to give you the contour and measurements of any section of a part, then there is no reason why a detailed replica cannot be sculpted. In other modeling genres, creating the plans may be a matter of obtaining the right photos of the original subject and interpreting the perspective of the photos to create measurements. In this case, the original subject is a drawing whose perspective is apparently flawed, and whose subject is apparently inconsistently rendered. And yet, the original lineart for the subject defines the shape well enough that I can identify it. It has a form. It has characteristics which define subtleties in that form which distinguish it from other, similar forms. My goal is to represent that form as well as I can.

This is the first orthographic rendering I made of the Zaku Kai. Much of it is the result of taking measurementes front-view lineart of the Zaku Kai, printed to 1:100 scale on metric graph paper. Some measurements and shapes I had to work out myself, whether because of difficulty interpreting the perspective of the lineart, or because of contradictions in the lineart. The result is a flawed sketch, done freehand on graph paper. Anything which isn't aligned to the perpendiculars is skewed. And yet, it's the first time I feel I've really drawn the Zaku Kai as it ought to look. I've since attempted to create new front-view renderings, experimenting with different measurements and shapes for some of the parts, but as yet I've been unable to come up with anything that I feel works as well as this rendering.
The chest is one of my favorite areas of the Zaku Kai design. I think it's one of the design's most distinctive features and also one of the points that's most frequently gone wrong in model renditions of the subject. In addition to direct observations and measurements from the lineart, I based the design on some guiding principles; it's hard to call them "observations" because they are subject to being contradicted in animation or sometimes in the reference lineart. But these are the things that I believe to be true regarding this design, and which I wanted to guide my rendition.
Much of the arms is simply my best rendering of the design from the lineart, mixed with an attempt to keep things a reasonable size, and tie the design to that of the original Zaku in terms of how it's constructed. The upper arms were a bit hard to nail down, so in my rendering they're a combination of the shapes I can see in the lineart with human musculature - "biceps" and "triceps" represented in armor shape. Around where the "deltoid" would be is an interesting feature of the original design, the sort which usually makes faithful model representations difficult. On my drawing you can see a rounded tab connecting the shoulder to the upper arm part. Because of how this bit is connected to the upper arm, it must turn with the upper arm as the arm turns. But the lineart doesn't really show what any of that is connected to. For my rendition I decided that the shoulder underneath the armor would be spherical. This is common in some of Izubuchi's other designs, such as the Nu Gundam. The upper arm and the "deltoid" tab then form a hollow sphere-shaped cuff which slides around the outer surface of the shoulder sphere. The main problem with this design in terms of posability is that it limits how far the arm can swivel outward according to the point where that tab hits the strut connecting the shoulder to the chest. Another complication is that the shoulder armor on the right shoulder needs to fit on top of the sphere and leave enough room for the arm to move around. I've tried to make it a size and shape I'm happy with, though it is inevitably a compromise.
The head of the Zaku Kai is unusually small among Gundam subjects. It is also distinctive, and helps to create the look of a massive, bulky machine on a frame only marginally larger than the original Zaku. My observations of the Gundam 0080 anime and of the Zaku Kai lineart suggest that the head itself is about the width of the middle part of the chest block, and so I made my head only slightly wider than the top part of that segment. There are times when I look at the lineart and the head looks too small, and other times when I look at it and it seems absolutely perfect. I think in the end it'll remain as it is.
The legs are the absolute worst part of this drawing. Inconsistent, skewed, and generally sloppy. (It should also be noted that I drew the left leg first, then drew the right leg, incorporating different ideas and changing some details - I then did some work to reconcile the two versions, but that effort wasn't worth completing.) I found it easier to refine the design for the legs as a separate drawing. However, the intiial rendering here established a few design directions I want to pursue.
This drawing was a good start to this project, and is still the basis for composites generated on the computer using this lineart in combination with updated drawings for the legs. It was my initial codification (and disambiguation) of measurements from the lineart and likely most of it will survive to the final versions of the design.