The Beast Returns
By tetsujin on 2009-04-12 in Models
Tags: 1:100 Zaku Kai, arm construction, shoulder armor construction
It’s been a while since I’ve posted an update to my Zaku Kai project: much of that time has been spent on other pursuits, but there’s also been a fair bit of work done that I simply haven’t found time to document fully. Most recently I’ve been working on the shoulder joints and the arm parts.


Because my goal is to ultimately cast copies of the finished model, I’ve found the design of the model’s joints to be surprisingly challenging. One question that stumped me for a while was, if I use a polycap, what kind of polycap do I use? The fact that this was even an issue caught me off-guard. Normally I’d just use a polycap from my extensive collection of Bandai spares. (Most Bandai kits include more polycaps than the kit actually needs, so if you keep all the spares you can develop a pretty good collection after building a bunch of models…) But what if I wanted to sell cast copies of the model as a kit? I couldn’t very well write in the instructions “scrounge around for some polycaps”. Then there were issues of how to mount the polycap such that the setting could still be recast, but without adding a bunch of extra parts to the build… For now I’ve settled on Kotobukiya Rolling Joints and T Joints – both types are quite versatile – though I’m thinking of designing the settings so they can accept Bandai polycaps, as well.
About three years ago I spent a good deal of time creating some three-part spherical hinges for use as 1:144 Sumo elbows. When I designed my Zaku Kai plans I decided to see if it would be feasible to use those parts in the Zaku as well – it seemed they would be about right for the shoulder joints, so I incorporated that into the design. When working on the Blender version of the model I embellished these a bit – turning them from simple divided spheres into something a bit more elaborate.


The first part of this embellishment I applied to the kit part was the big minus mold that appears on the front and back of each shoulder. Because of the design of the arm it was important that this detail not extend outside the volume of the original sphere – so it was a bit of a hassle getting the minus mold thin enough to apply it that way. With that done, I made molds and recast the endcaps of the joint. I actually had to go through a few iterations to get a mold design that worked – tilting the part in the mold so that the detail areas faced downward, and the lines of detail followed the flow of resin were key changes I made in later versions of the mold. I am a bit concerned about the precision of the center axis for the part – I used the mold rubber to create the hole in the part this time, instead of embedding a rod in the mold. It actually came out a bit crooked. But I think that when the joint is assembled it all works out…

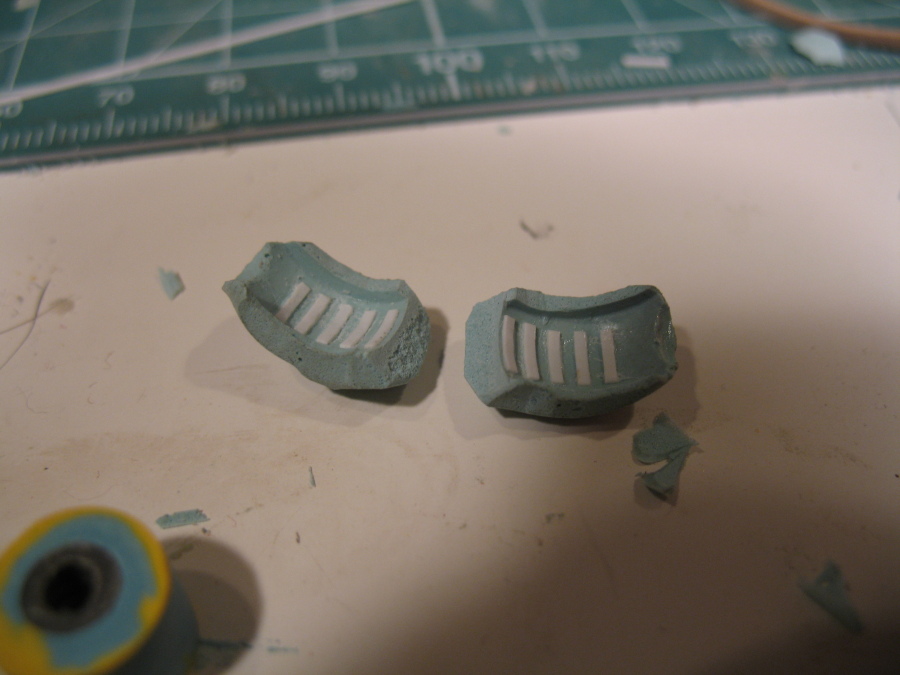


Next up was the addition of the recessed rectangles to the center segment of the sphere. To create those details I first used Bondo to create a negative form of the part, then glued down a bunch of styrene strips to the inside. I just eyeballed ’em for accuracy, hopefully that’ll be good enough. Then I carved out the whole area on the original part, gooped some Bondo into the new recess and smooshed the negative (broken in half, for easier removal later, and greased up with petroleum jelly for easy release) into it. It looked pretty rough initially but after some sanding and tweaking I think it looks pretty good.
The last bit I did was the part that joins the shoulder sphere to the shoulder joint in the torso. The shoulder hinge has three parts – the center rotates on the rod that joins the two end caps. The center also has a polycap coming out one side, which connects the shoulder sphere to the upper arm and provides the upper arm’s rotation. The shoulder rotation is provided by a joint mounted in the chest block, but the rod that goes into that polycap must attach to the end caps of the shoulder hinge, rather than the center section. In my Blender model I dealt with this by creating a spherical shell segment that went over a small portion of the joint, connecting the two endcaps to each other and to the shoulder strut.
I had intended to make this spherical shell-section the same way I once made a hollow hemisphere – use poly putty to create an impression of, say, a 17mm sphere for use as a mold, grease it, then fill the hollow space with more poly putty and stick a 14mm sphere in to create the inside surface of the shell. However, I didn’t have a 17mm ball bearing handy, so instead I rolled out some poly putty to a sheet 1.5mm thick, peeled it up and laid it onto a 14mm sphere, let it cure and cut it up to get the basic shape I needed. I think it’ll be precise enough for my purposes once I clean it up a bit.


Since the shoulder joint is shaping up nicely I decided to get started on the upper arm, using my Blender model as a guide to create cross-section templates, and filling in the rest with epoxy putty.


In one of the overview photos you can also see some of the stuff I was working on late last year – the beginnings of the midriff, hips, and skirt armors. It doesn’t look right having just the front skirt armor, unfortunately – the effect will be much nicer once I get the full set of skirts on there.
I also made more progress on the shoulder armor since the last update: In particular, I counter-sunk the spike “fringes” and built up the surface of the part a bit to make it look more regular. Here’s where the Aves putty I’m using for the part gave me some trouble: epoxy putty doesn’t stick to itself nearly as well as polyester putty, so if you carve or sand it later the new material has a tendency to come off in chunks. I’m going to try some more, see if I can get better results by making sure I apply the new stuff while it’s still good and fresh – but as it stands I just wish I’d built the damn part from poly putty. Even a cheap putty like Bondo would yield a part that’s much more workable than what I’ve experienced with Aves on this project.
One other bit I’ve been working on is the knee joint. More precisely, this is a part I created for my Armored Core “Cherry Bomb” knee joint – a 9.5mm diameter, 7mm length solid cylinder with a 3mm hole on its axis. The amount of time I waste building these kinds of parts out of poly putty, spinning them, sanding them down and building ’em up again – and the rather imprecise results I get in the end – it makes me think that one of these days I ought to just get myself some kind of metal lathe or something. This part is coming along pretty nicely at this point, but in terms of its use on the Zaku, there is a problem… The Zaku’s knee joint is wider than the Armored Core one, 10mm length instead of 7mm. It may be possible to cast a couple copies of this new part, splice them together on a 3mm steel rod to create the 10mm part, or I may just have to start over… Or I may be able to use them as-is. I’m not really sure yet.

To Gundam fans, 2009 is the thirtieth anniversary of Gundam. To me, the fact that it’s the twentieth anniversary of Gundam 0080 is more relevant. I hope to have this model done by the end of the year to celebrate. :)
Post a Comment