Try Not
By tetsujin on 2012-11-08 in Models
Tags: 1:100 Zaku Kai
With SCGMC looming, I have at last set myself to work on the Zaku Kai project once again, with the goal of getting it into some kind of presentable shape by the time of the con. Lately the work on this project has been pretty intensive, as I’ve done my best to get back to work on these parts and whip them into shape.
Personally, I can’t discuss scratch building without bringing up the thing that, to me, is one of the greatest obstacles to completing a scratch build project. I have trouble articulating it sometimes but I think it could be described as a lack of confidence. Many people in the hobby see scratch building almost as a kind of black magic beyond the reach of mere mortals. This attitude is poisonous, and it infects everyone it reaches. Kit builders think they can’t scratch build, and since many of them never try, that belief is never challenged. In my case, the problem is a bit different: I have had this project in the works for over six years now, with design drawings going back farther than that. It almost feels as though I have always had this project in the works, and that I always will. I have become too comfortable with that, it’s too easy to look at the parts or old WIP posts and think, “Gee, I did some nice work there.” The confidence issue also comes into play when I consider issues like, “How good is good enough?” I have tended toward an overly rigorous approach to this build, I think, because I lacked the confidence in my own ability to refine a part to precision after its initial construction. But after all that work trying to make the initial build as good as possible (using data from the Blender model, etc.) I wind up having to go through the same refinement process anyway.
Another problem I face is that the way I approach the work can have a big impact on whether I get the kind of results I need. A lot of the time I’ve approached certain parts with the intent of making some good progress on them, improving them or finding a way to check their symmetry or whatever, or starting work on a new part, for which any amount of progress will be a major improvement over nothing at all. The result, it seems, is that by setting these goals short of my true aim, I satisfy myself that the work is still progressing, but without pushing any parts all the way to completion.
This is why I’ve rolled out a Yoda quote for the title of this WIP post. “Try not. Do, or do not. There is no try.” I’ve got to stop “trying” and start “doing”. That’s exactly what I’ve done for the last couple of weeks, and so far I think it’s been pretty successful. By aiming for completion, rather than progress toward completion, I have changed my mindset and my approach. I don’t know if I will succeed at getting the model ready for SCGMC, but I intend to do everything I can to make it happen.
Legs
The legs have been one of the more challenging parts of this build for me. They’re made up almost entirely of compound curved surfaces and soft edges. Each leg is asymmetrical, with the left one a mirror-image of the right, which means I can’t simply make a leg and copy it… I have to make the outer and inner halves of the lower leg separately, make sure they go together with each other, make sure they match their counterparts on the other leg, etc. The current lower leg parts are the result of my third major attempt at building the leg parts. I think the method I used to construct them struck a nice balance between precision guides where I needed them, and simplified construction where precise guides were less important. However, they still require a lot of work to get them ready, and once I get the basic shape done I still have to hollow them out, add the thruster ports, etc.
One of the first things I did when returning to the project was pick up those leg parts and start sanding them where they needed it. I knew the parts needed work, but after all the time since the last big burst of work on the project, I think I forgot just how much work was needed. Early on I put some effort into making sure the various halves would all match up properly – gluing them to the other half of the same leg, or the same half from the other leg, to check the general shape and the profile. There were places where they didn’t match up very well, but I’ve made quite a bit of progress there. In working on the curvature, I found it useful to actually ignore the guides in places: in some cases the guides weren’t placed precisely enough or were pushed around by the epoxy putty, so following them too slavishly makes a weird surface. I’m relying on the contour gauge more than the styrene guides at this point.
The upper area of the lower leg, around the knee and the front edges of the lower leg is the same on all the parts – it’s also one of the more complicated bits of the lower leg, so at this point I really want to limit how many copies of that area I have to match up – so I’ve focused on the ones on the inner halves of the legs, and plan to recast these (when they’re ready) for use on the outer halves. At the same time I’m thinking about how I want the cast parts to come together in assembly… Left/right halves might not be the best solution once I’m working with the final cast parts.

")

. Undesirable depressions are still visible on the ankle fringe.")


 I think the inner halves are definitely in better shape at this point.")


Skirt Armor
Around the time of my last project update I started work on the skirt armors for the Zaku. It was exciting to see the work progress, because it’s one of those really gorgeous and distinctive parts of the Zaku Kai. The staggered edges, the sheer breadth and bulk of it, I think it’s a big part of what makes the Zaku Kai great. I think I captured all that pretty well in my design plans, and so seeing those parts start to come together was really exciting. I actually built up all the basic forms of the skirt parts two years ago, and had planned to post the work as a third WIP update on the project in that year, but I got a bit sidetracked I guess. I look forward to sharing pictures of the completed skirt armor set when the time comes.
So these are parts I built two years ago but never put in a WIP post (apart from the front skirts in a very crude state). Returning to work on them after all this time, I focused on adding missing detail and refining anything that seemed too crude. I’d added the sloped portion of the front skirt armors some time ago, so I began work on the cut-out sections of those, as well as the thrusters that are inset on the front and rear skirts.


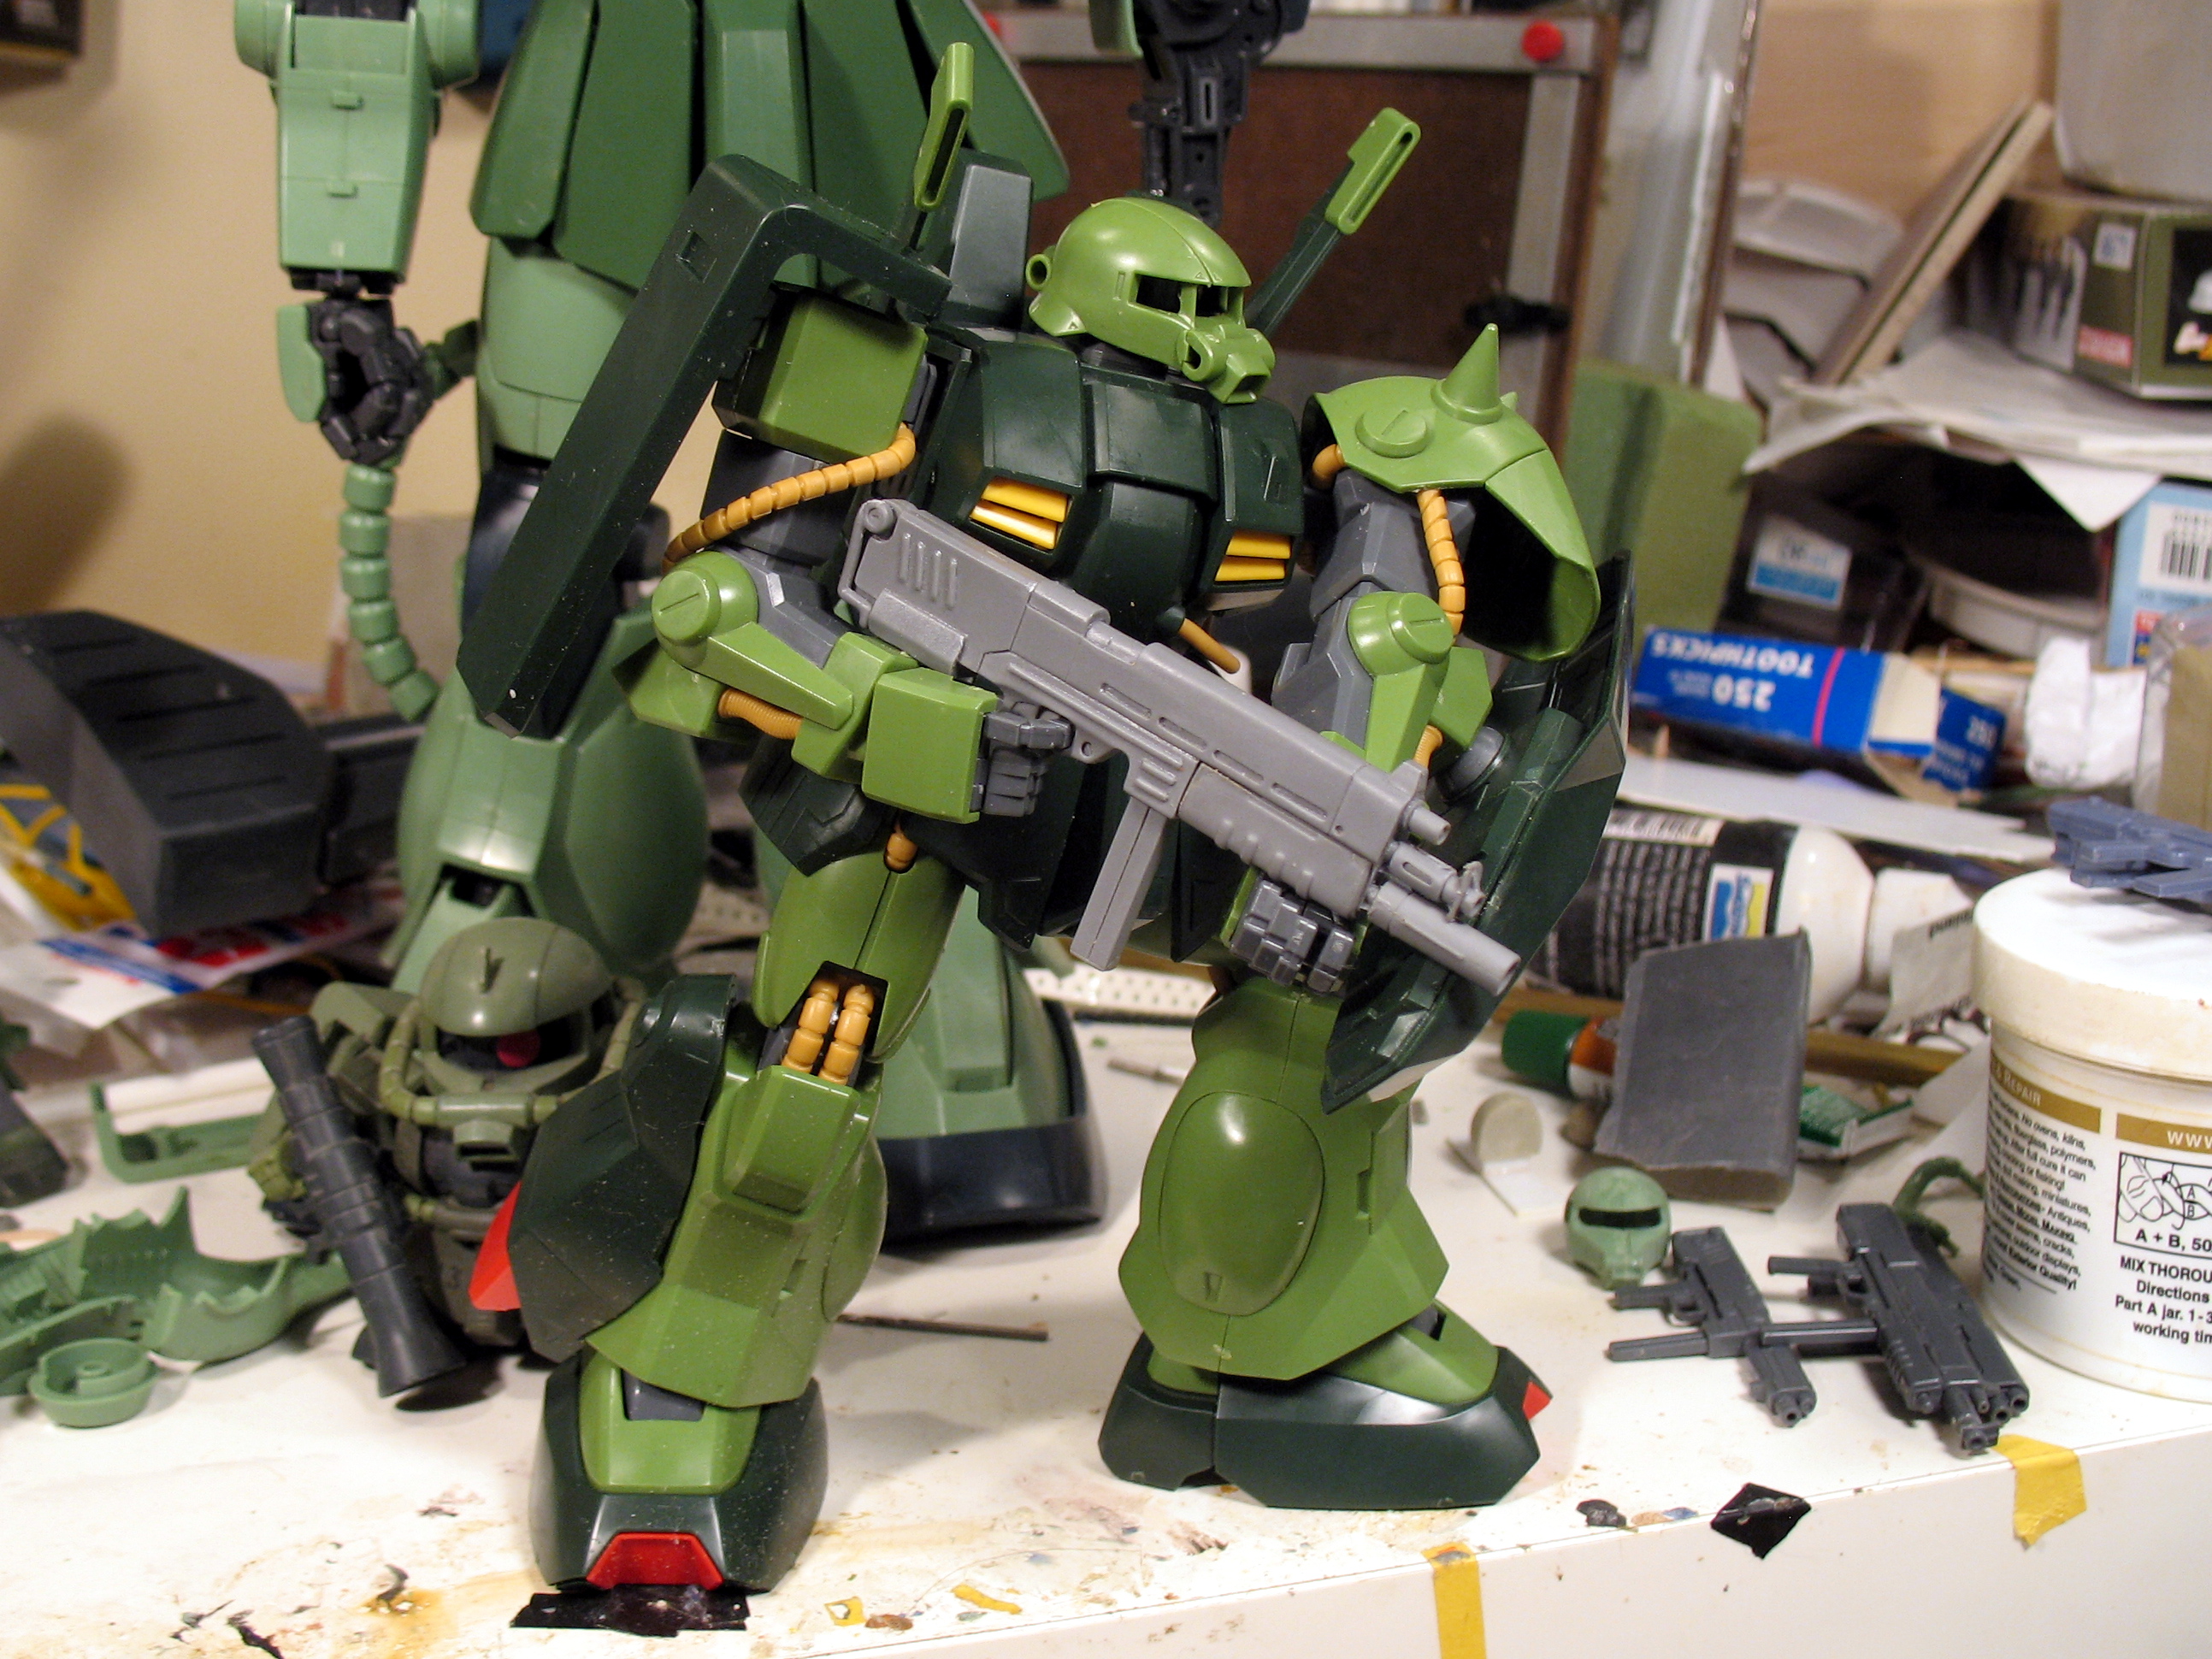
Shield
The shield is one of those parts which, until now, I haven’t worked on at all beyond designing it on paper and in Blender. When I attended my local IPMS model club meeting last week, I brought all kinds of tools, and planned to work on the Zaku while at the meeting. Unfortunately I forgot to bring the Zaku itself, so I decided to spend the time building a new part, the shield. I made some good progress with it (hardly surprising, the shield is like a bent rectangle, really simple) but I wasn’t entirely happy with it so I decided to start again.
So far that’s just meant cutting a thick plate of styrene to the width of the shield, then cutting it to length, scoring it to form a bend, and drilling holes in it. Still, the effect is pretty good so far. I need to thicken it up (to about 5mm, rather than the current 2mm) and deal with all kinds of little details, but it’s a good start.

")


MMP-80
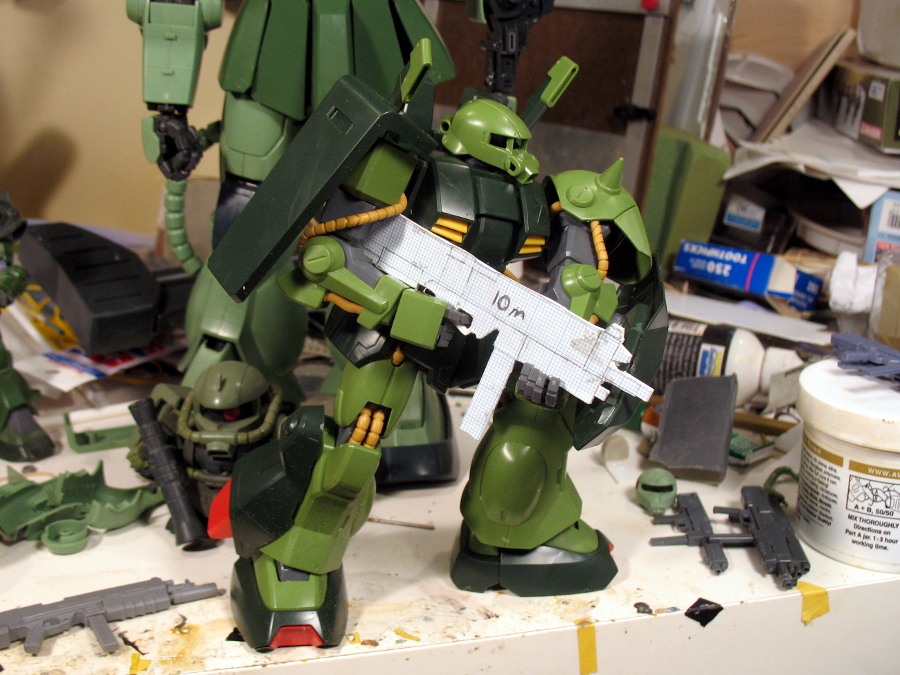
My work on the Zaku’s machine gun is a bit weird because for the longest time I didn’t do any work on it, no designs or anything. When I was designing an avatar for myself with the Zaku’s silhouette holding the machine gun, I made a really crude mock-up of the weapon for the purpose… It’s pretty strange, because I love the Zaku Kai’s machine gun. When I finally took a crack at drawing up design plans for the weapon, it was for another project, my 1:60 Rick Dom II conversion… So the plans were drawn in the wrong scale.
I haven’t done a lot of work on the MMP-80 at this point, but I wanted to feel comfortable with the choices I was making about the weapon’s size and proportions. I wanted the finished weapon to look good and also (if possible) make it not look entirely out of place in the company of the 0083-style MMP-80s that come with the MG Zaku F2 and the original MG Zaku. I did a bunch of tests with the weapon scaled to different lengths (8m, 9m, or 10m mostly) and compared different kit versions of the weapon, including the 1:100 scale B-Club one I bought ages ago.


Conclusion
I’ve got about a week to do this for SCGMC. As I said, I don’t know if I can pull it off. If not, then at least I’ll be better off for having made the effort. There’s still tons of work to do, all kinds of areas of the body that don’t even have a rough build, let alone a refined part. Even if things get built, that still leaves the painting process to consider… I don’t want to let things like that discourage me, however. Right now I’m making lots of progress on the project, and it feels good.
Wow. This looks great! Good luck with your work!
A. Lurker | 2012-11-10 | Reply