By tetsujin on 2010-01-21 | In Models | No Comments »
Tags: 1:100 Zaku Kai, leg construction
It’s been a while since my last update to this project: the Zaku project goes on and on, but there’s always other things I want to do, too. After all, I still haven’t finished my Armored Core group build entry. (close, though) Still, there’s a fair bit of new stuff to share.


Read the rest »
By tetsujin on 2009-11-19 | In Models | 3 Comments
Tags: 1:72 Armored Core CR-C75 "Hakuheisen", electronics, microcontrollers
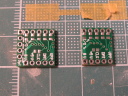
In the last post I talked about how I recently had a board fabricated that I’d designed… The purpose of this board is to make it very easy for me to install a microcontroller inside a model, even in very tight spaces… The general parameters of the design (specifically, the size) were dictated by my “Armored Core Hakuheisen” project: the one site on that kit that is central, easy to access, and easy to hollow out is also very small – at most I could probably fit a board about 10mm wide and 13mm long in there. Using a regular pin-through-hole type IC in there, the chip alone would take up most of that space, and I’d have no space left for resistors or connectors. So I set out to design a board that would make it easy to install a very small surface mount PIC and host the resistors on the board itself. I’ve gone through several iterations of this design – the version that was manufactured was version 3. For those curious, I’ve decided to write about some of the earlier (and more recent) versions.
Read the rest »
By tetsujin on 2009-11-16 | In Models | No Comments »
Tags: 1:72 Armored Core CR-C75 "Hakuheisen", electronics, microcontrollers
When I got started on my recent Armored Core project I decided I not only wanted it lit, I wanted to light the head and all the thrusters… Not only did I want ’em lit, I wanted to be able to control the brightness, too. And not only control the brightness, but control them via an interface to the PC… And not only that, but I wanted this control system to support the connection and automatic control of many models’ lights, all at once… Needless to say it’s been a slightly complicated endeavour. At least, for me. I’m sure someone else could do it quite easily.
The trick is, the one place on this kit where it’s really easy to install a circuit board in this kit and be able to access it later is the belly – and there’s not much space there. If you cut out some of the excess material you can get a space about 10mm wide and maybe 13mm long in the belly. It would be possible to get more space up in the torso, but it would mean gutting the area in question, and then possibly rebuilding the area to give it structure again… And while the torso seems quite large, the problem there is it’s very very flat. Short of cutting up the torso (for instance, something similar to all the cockpit mods you can see on AC Armory) it would be very difficult, in my opinion, to install a circuit board in the AC’s chest, especially if you need to be able to get at it…
So my solution to this problem was to design a circuit board for projects like these – a board just about as small as I could manage, but incorporating as many features useful to controlling and lighting a model as I could manage. Today, after a couple weeks of waiting, I finally got the boards back from BatchPCB, the fabrication service I used… There is good news and there is bad news…

Read the rest »
By tetsujin on 2009-11-09 | In Models | 3 Comments
Tags: 1:5 Dalek, 旧キット
One of my coworkers, after learning of my interest in model-making, was kind enough to give me various items from his old collection. These included a couple vintage ARII and IMAI Macross kits, as well as “Fred” here…

Read the rest »
By tetsujin on 2009-10-19 | In Models | No Comments »
Tags: 1:72 Armored Core CR-C75 "Hakuheisen"
I’ve been pushing to have the Hakuheisen ready in time for Granitecon – due to various circumstances that didn’t quite work out. First I had to give up on the idea of having a display base ready to go with the kit, then I had to put off completion of the leg wiring, then I had to delay the weathering phase of the project – then I had to finish up the basic paint chipping and wash as an all-nighter just prior to the show. But in the end I had a pretty good model to bring with me to the model show – I am always happier at these things when I’ve managed to get a project ready to bring…
Read the rest »
By tetsujin on 2009-10-17 | In Models | 2 Comments
Tags: 1:72 Armored Core CR-C75 "Hakuheisen"
I have a day left before Granitecon and still lots to do to get this project ready… The good news is that the basic painting is done. There’s touch-ups and paint chipping and washes and weathering to be done, but all the basic colors are on, and where they should be.
Read the rest »
By tetsujin on 2009-10-04 | In Models | 2 Comments
Tags: 1:72 Armored Core CR-C75 "Hakuheisen"
There have been a few delays, but I’m finally making real progress on the Hakuheisen again. Recently I painted a metallic basecoat on the parts as well as a couple layers of Future gloss. Now I’m getting started on painting the final colors on the parts. This project will feature a lot of “paint chipping” effect, and this time around I’ve decided to create the effect using the “hairspray” technique – spraying the parts with hairspray, painting the final color, and then using water to weaken the hair spray to make it easy to chip away bits of the newly applied color coat.
Read the rest »
By tetsujin on 2009-09-22 | In Models | No Comments »
Tags: 1:144 MP Guncannon, sockmonkey
So, work continues on the MP Guncannon… Since last time I’ve replaced the wrist joint with one that looks better, and I’ve begun the work broadening the feet and shortening the lower legs…
Read the rest »
By tetsujin on 2009-09-19 | In Models | No Comments »
Tags: 1:144 MP Guncannon, sockmonkey
I’ve been working on an Armored Core project lately – unfortunately I’ve been unable to get anywhere with it lately because I’ve run out of Mr. Color black paint… So while I wait for my paint to arrive in the mail, I’m working on some other things. For the last couple days I’ve been working on the HGUC RX-77D Guncannon Mass-Production type. This is the version of the Guncannon which appeared in Gundam 0080. The HGUC kit is pretty good overall but as with most of the Gundam 0080 HGUC kits its representation of the original design is a bit distorted… Since getting the kit I’ve been a bit unsure about how to go about correcting the issues with the kit.
Inspired by Hobby Japan’s recent re-release of their “How to Build Gundam” books, I decided to finally take on the challenge of building the kit, and trying to correct its deficiencies.
Read the rest »
By tetsujin on 2009-07-30 | In Armored Core Group Build, Models | No Comments »
Tags: 1:72 Armored Core CR-C75 "Hakuheisen"
I had been trying to finish this up for Otakon in mid-July but that didn’t work out… When I first resumed work on the project there was more that needed to be done than I had thought: the planned wiring was unfinished, some parts hadn’t been sanded or even glued, and so on. In the weeks leading up to Otakon I was almost able to get the model ready for paint: with a few days left before the convention I decided I wasn’t going to be able to hit the deadline.
Now, with the convention behind me, I’ve resumed work on the project. At this point I’m returning to aspects of the project I’d had to skip in my attempt to hit the Otakon deadline and setting up the kit parts for painting.


Read the rest »


